Category Archives: costumes

Tiny princess

Tiny princess
I just wanted to pop in from all the Christmas/holiday/preparation/craziness to show you guys what is probably the cutest thing I’ve ever made. I’m dying. If you follow me on Instagram then you’ve already seen some sneak peeks.

I can’t remember how I got roped into making this. I’m pretty sure it was because my mom was telling me about my cousin’s two year old daughter who to wear anything not pink and my mom wanting to buy her a princess dress to bring when we visit them in Taiwan (For which we’re leaving tomorrow. Did I mention that? Because that’s happening. I should pack.) and I said “I bet I can make a cuter one for cheaper.” I’m pretty sure I won that, since this dress cost me all of $8.

I started off with this sketch. I knew I wanted pink with a contrast front panel, a flouncy overskirt, and giant puffy sleeves. And tons of embellishments. I made some adjustments but it pretty much came together exactly how I imagined it.

Tiny princess

My aunt sent me a list of measurements, which I used to just sort of eyeball the pattern pieces. This was difficult because a) the measurements were in centimeters, and b) she sent them back in May and tiny humans grow alarmingly fast. I added about 2″ to most of the measurements and ended up putting in shirring in the back and elastic along the back of the waistband to help with fit. And so it’ll hopefully fit her for more than five minutes.

Tiny princess

The other annoying thing is this fabric is such a terrible poly that it was constantly unraveling into fluffy piles everywhere. The fact that I screwed up the skirt and had to unpick the entire thing meant I was leaving fluffy piles of pink all over sewing club. On the bright side, Laney donated a gorgeous little flower patch that I stitched onto the center front. I was originally going to do another bow but I figured a bow on each puffed sleeve was enough and this looks much more polished. Tehe.

Tiny princess

So yeah, fingers crossed it fits her! And merry holidays everyone!


Glitter everywhere

Elsa progress
PAX registration madness happened last Wednesday and now I’m all piney and excited about an event that’s still five months away. To entertain myself in the meantime, I decided to get started on one of my PAX costumes!

Last year I wore this monstrosity and while it was super fun to get all dressed up, I was the only one in my group who was really dressed up (Boyfriend wore a Jayne hat) and I was about six feet wide. If you’ve ever been to a con (especially one as crowded as PAX gets), you’ll know this is not the best of ideas. Also not being able to sit down wasn’t so much fun. I think I lasted about two hours as Kaylee before we ran home for a quick nap and I changed into Clara. Much more mobile. I decided that this year I’d do one ridiculous costume day and one more mobile and toned down day. Except I have about seven costumes I want to make and I’m only going two days.

The other part of this (very rambly and probably uninteresting) story is that I hadn’t seen Frozen until about two weeks ago because I had so many projects going on and I knew I’d immediately want to drop all of them to make all of the Frozen costumes. The moral of the story is that I’ve given in to the sparkly and I started Elsa’s costume this week.

Corset

I’ve done some rough sketching and I’m thinking it’s either going to be a three piece outfit or a dress/cape and corset. There’ll be a mesh undershirt with the cape attached, a corset, and a slitted skirt. I haven’t decided whether it’ll be easier to have the skirt/mesh top attached or separate. So far I’ve started working on the corset using Butterick 4254. I added an inch to the length and cut a sharper V for the sweetheart neckline. I cut up some cotton twill curtains that I’m no longer using for the corset and I’m lining it with some rayon challis because it’s the only turquoise fabric I had lying around and it’s super soft.

Elsa progress

Anddd now I’m experiencing that awful twitchy feeling where you reaaaaally want to work on something but should probably wait for the rest of the materials before continuing. Right now I’m waiting for boning and lacing stuff but eight sheets of this stuff in turquoise (please be enough! *fingers crossed*) arrived yesterday and I’ve sort of succumbed to the glitter. I’m cutting the sheets into tiny rectangles and slightly bigger rectangles and then gluing them on to the corset with tacky glue. I’m trying to make them all different shapes so they don’t quite fit together and then gluing the tiny ones on top to fill in the gaps. So far so good! Except I can’t go anywhere near the bottom or the back edges because I haven’t inserted the boning, sewn on the bottom edging, or done the grommets for the lacing.

Thisisslightlyagonizing.

Hungerween // giveaway winner

Katniss tribute parade
me in Katniss’ tribute parade dress

Effie Trinket butterfly dress
my roomie made Effie Trinket’s amazing Alexander McQueen butterfly dress (yes those are individual butterfly wings and yes she’s promised to do a guest post on how she did it.)

Johanna Mason
my sister as Johanna Mason in the Mockingjay promos

Cinna
boyfriend as Cinna

Caesar Flickerman
roomie’s brother as Caesar Flickerman

Hungerween

If you’ve been following my instagram you’ll know that Halloween this year sort of turned into Hungerween what with a group of us choosing Hunger Games related costumes. I think it started when my roomie decided she wanted to make Effie Trinket’s butterfly dress from Catching Fire. And then it exploded.

We spent the better part of the last month putting together costumes and getting waaay into it. I’m still working on sorting through the 900 photos that were taken Friday night and will definitely be doing individual costume posts!

And since I completely forgot to post this in the midst of Hungerween craziness last week, the winner of the Love at First Stitch giveaway is Lisa!

Screen Shot 2014-11-02 at 11.38.10 AM Screen Shot 2014-11-02 at 11.39.37 AM

Congrats Lisa! Please email me so I can get your book out to you!

Kaywinnet Lee Frye

Kaylee shindig dress

Kaylee shindig dress

Kaylee shindig dress

Kaylee shindig dress

Kaylee shindig dress

Kaylee shindig dress

Kaylee shindig dress

Kaylee shindig dress

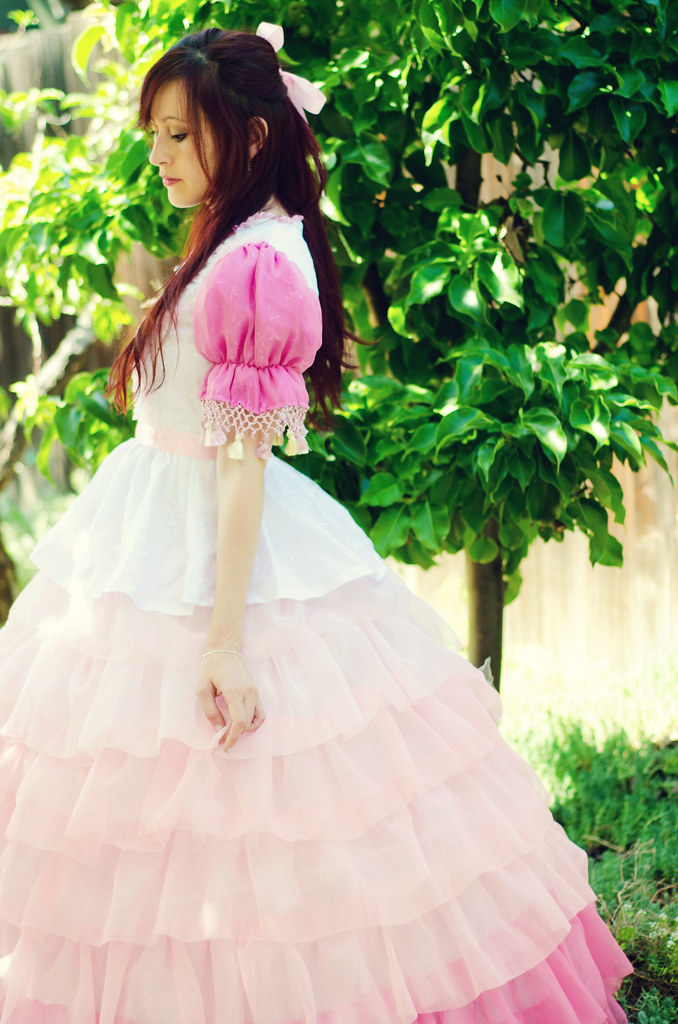
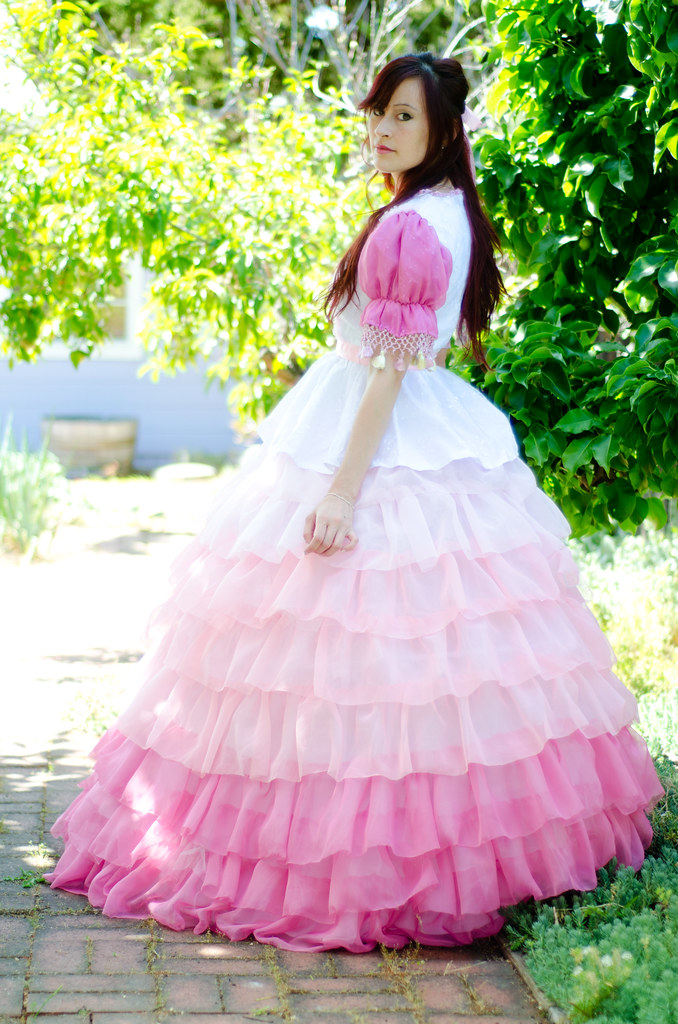
Also known as a confection in nine layers.

You guys, I finally got to photograph this dress (read: I dragged Seester out of bed while she was trying to nap and made her take photos of me) and I’m so excited to finally share it! I’ve been planning this dress ever since the first time I watched Shindig and the tiniest flicker of “Ooh maybe I should make that someday!” crossed my mind back in 2006. Then there was that time in 2007 when idiot me decided to try to make it in what was essentially quilting cotton. That was actually quite comical. I think I got about two ruffles in when I tried the skirt on and realized it already weighed ten pounds. Yikes!

Anyway, it’s done! The nitpicky perfectionist in me is twitching slighting and wanting to trim 1.5″ off the peplum and add a ribbon trim but I’m trying to smother her with pillows and shut her in an attic closet somewhere.

Since there are so many parts to this dress I thought I’d briefly share how I did each section.
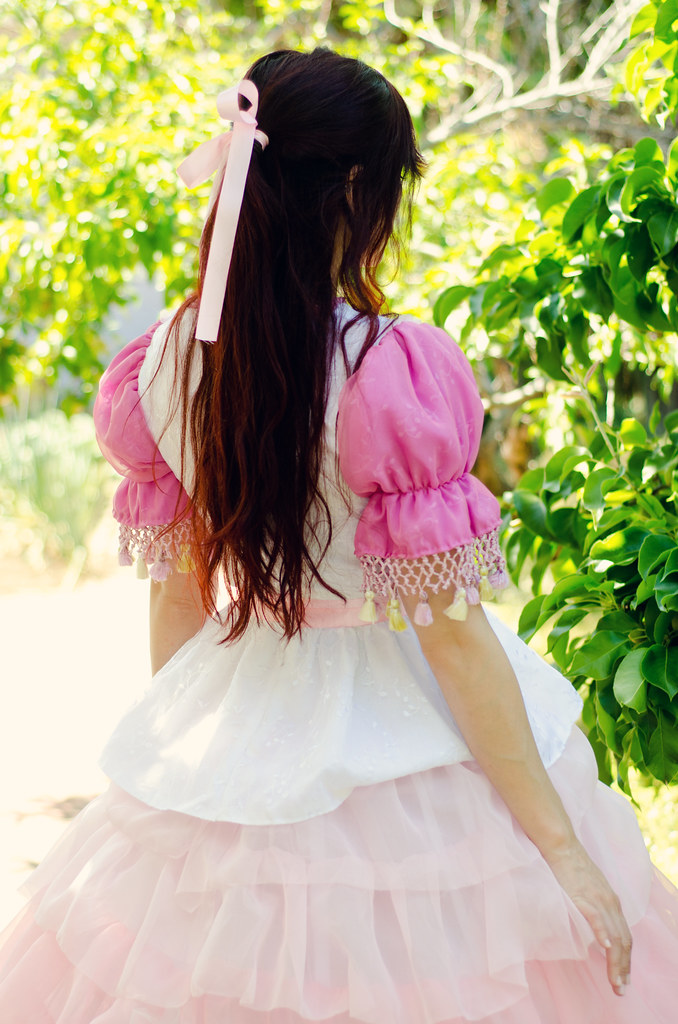
Bodice: 

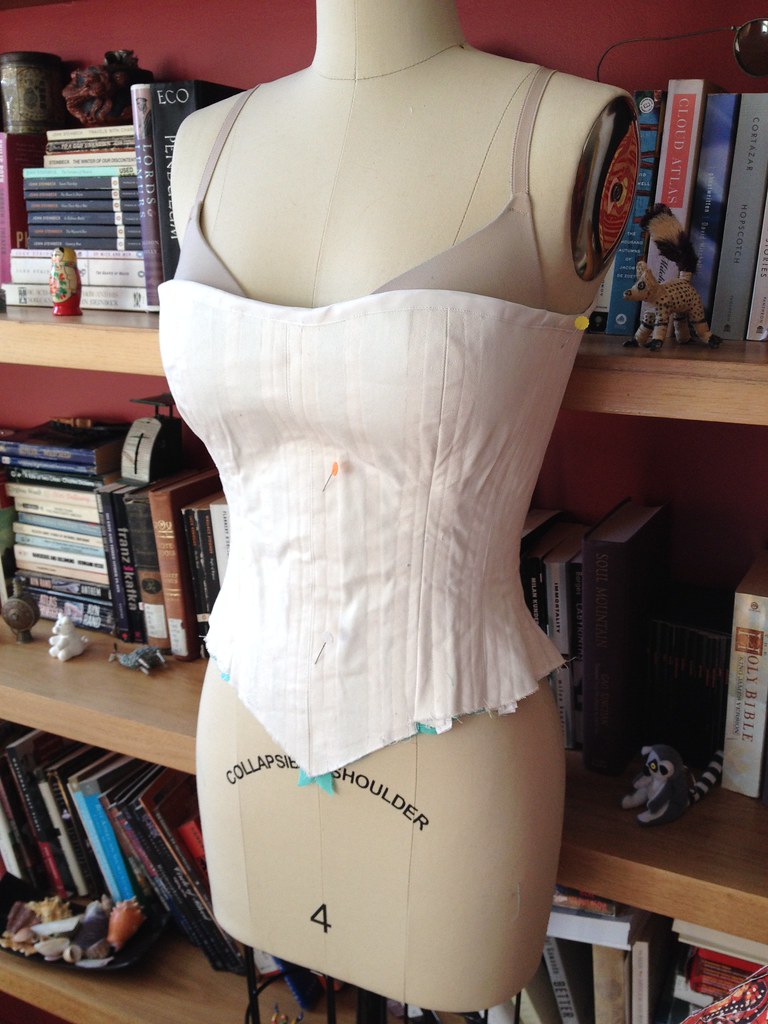
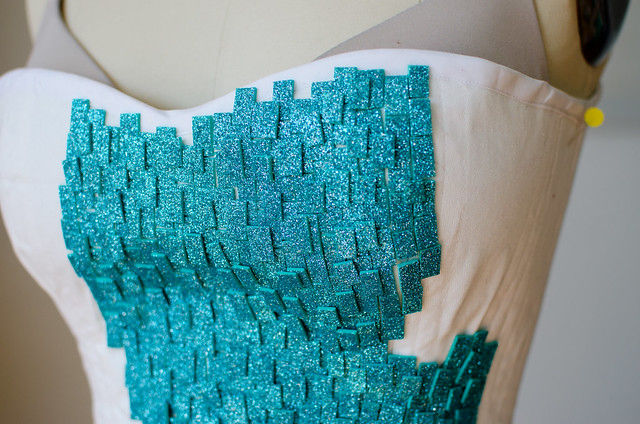
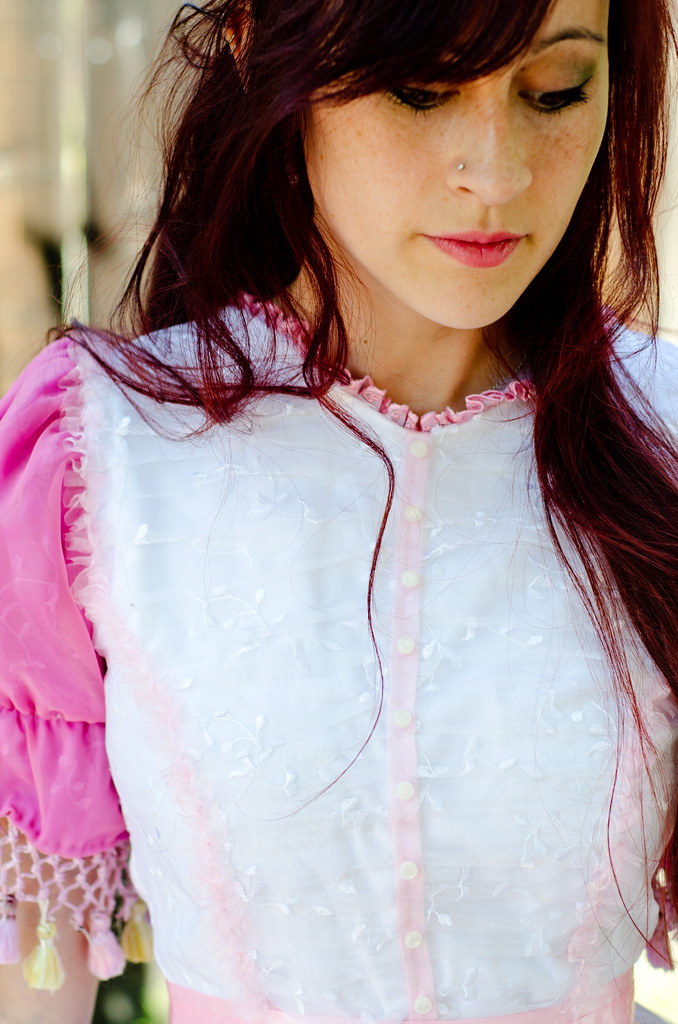
You’re going to laugh at me but remember in this post when I mentioned that to date I’d only made one successful By Hand London Elisalex? Well this was it. No joke. Obviously I altered the neckline a bit but that’s the pattern I started with. I raised the neckline significantly and then cut a slightly curvy V-shape. For the fabric I used some sheer white floral organza over a layer of white rayon challis, a layer of muslin for thickness, and then a layer of this crappy lining fabric that I sort of hate but was the right color. To get the ruffly/pleated look in the front, I basically used the same technique as with this dress to cut out the pattern piece, but then instead of tiny tucks, I just pinned down the pleats, ironed them in place, and then basted the sides down to the rayon challis and muslin and treated it all as one pattern piece.

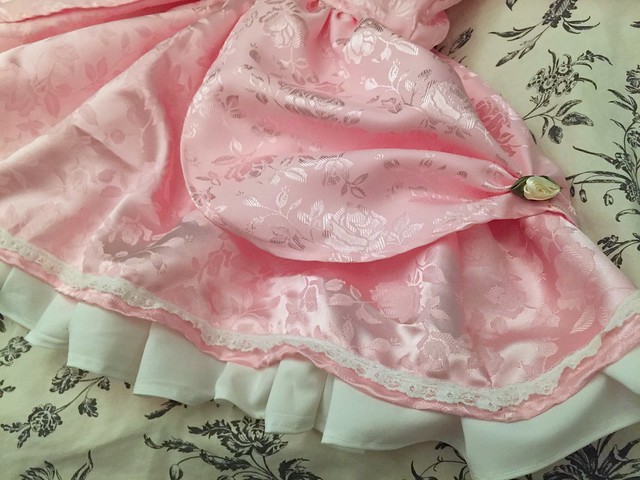
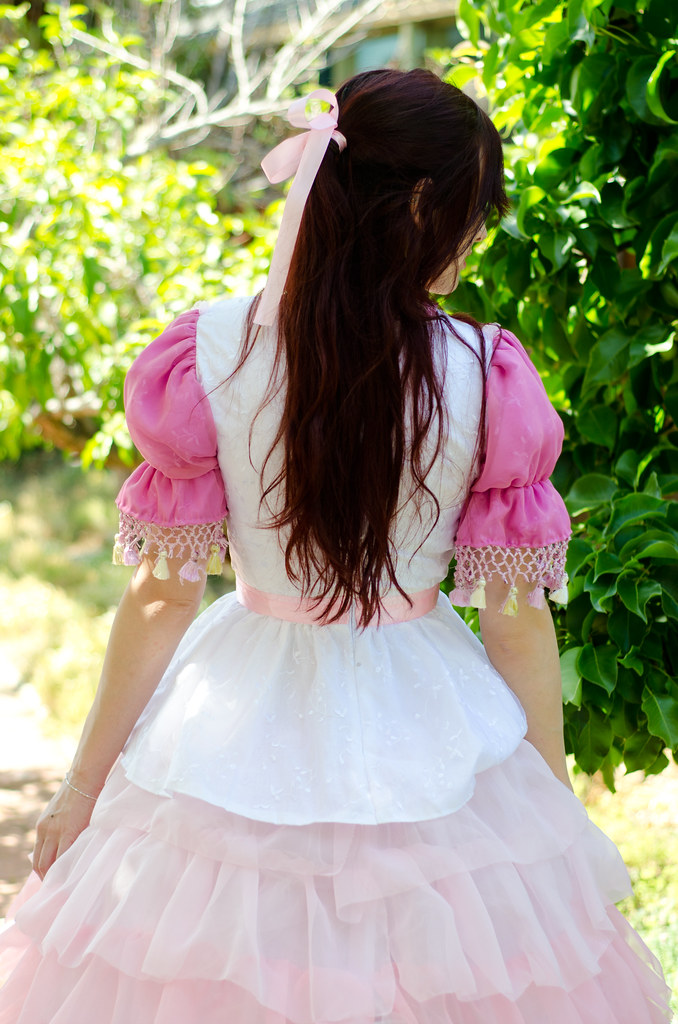
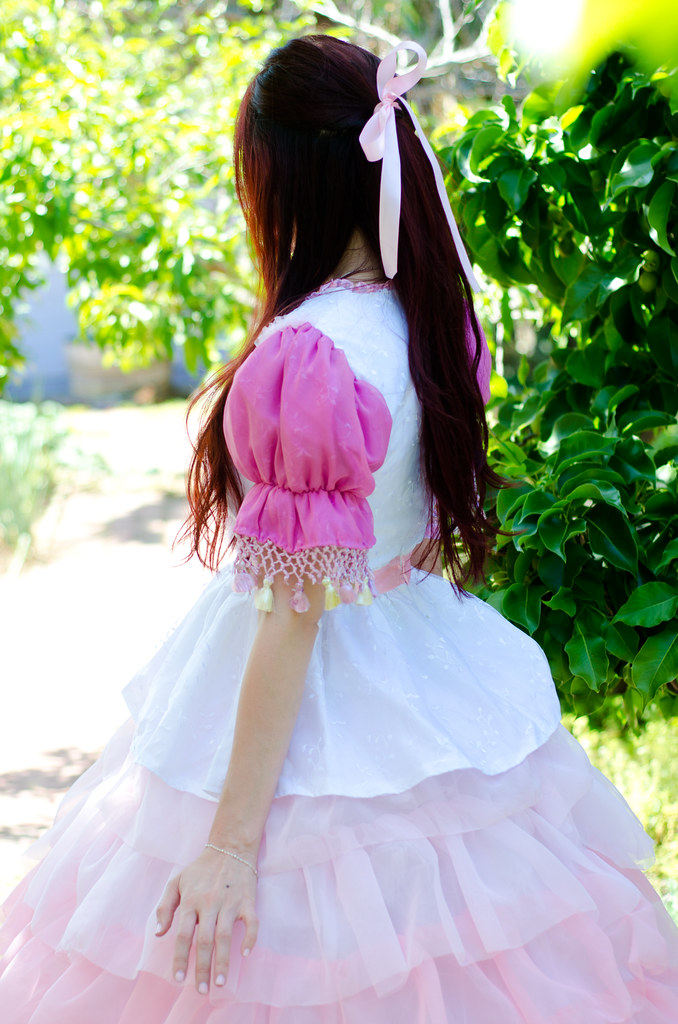
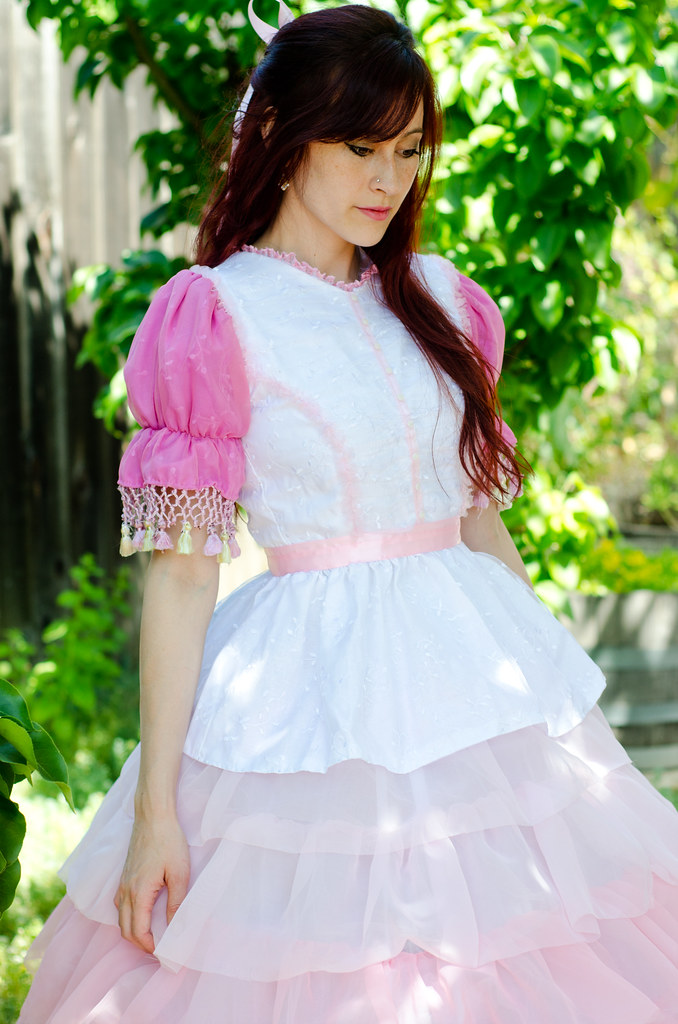
I used pink organza ribbon (2-3 layers I think) for the pink stripe down the middle and then just sewed white buttons on top of them like a false button placket. The “belt” is also wider pink organza ribbon. There’s also some pink lace trim along the neckline that I hand-stitched in. The peplum was done the same way as the rest of the bodice and was self-drafted by cutting out two curved trapezoids, and then cutting the back in half to accommodate a zipper. I measured the width by making the top edge of each trapezoid two times wider than the lower bodice edge it would be attached to in order to account for gathering. The back of the bodice is just held together by an invisible zipper.

Sleeves:

The sleeves were a bit tricky! First I kept drafting puffed sleeves that were too small. I still think they could be a touch more dramatic but whatever. Then I couldn’t get them the right color. I couldn’t find the sheer floral organza in the right shade of pink so I decided to dye them, which led to a wonderfully fun (and smelly) adventure of polyester fabric dye. It actually worked great except that the pink dye I bought turned out to be a more purply fuchsia that made the rest of the dress look orange. Ruh roh. So I tossed that idea, cut out new sleeves in white, and decided to sew a layer of the same pink chiffon used on the bottom tier of the skirt as an overlay over the white organza. You can still see the floral detail and they match the rest of the dress perfectly. I have no idea why I didn’t think of that first.

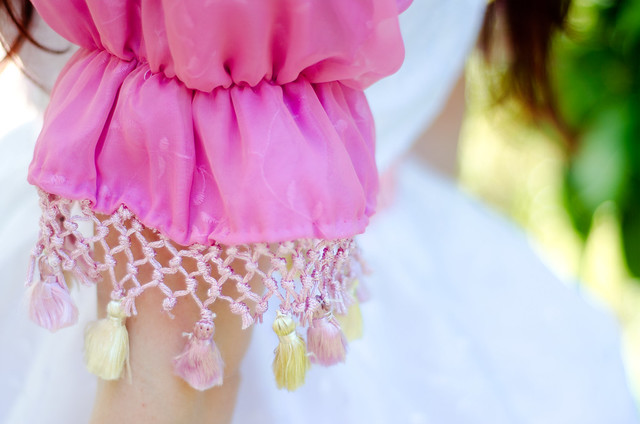
The chainette fringe thing was hilarious. I bought this fringe on ebay and then proceeded to watch all the youtube tutorials to knot it by hand. At one point I had it pinned to my pants and was trying to keep it even while knotting. In the end it was easiest to just pin it to the sleeve (which was at this point already attached to the bodice) and do it standing. The little tassels were harvested from a heinous upholstery trim that happened to have gold and pale ivory tassels. I had tossed the ivory ones in the pink polyester dye and luckily they didn’t turn out totally fuchsia. I sewed those on by hand, not terribly gracefully but I’m pretty happy with the effect.

Skirt:

This thing was straight up madness. I can’t even. I have a notebook somewhere with pages of scribbling as I struggled to do the math required to even figure out how many yards of each color I needed. I basically made a gigantic floor-length circle skirt out of a lightweight cotton, and then marked rows where each tier would go. Each tier consisted of sewing down a 7″ tall strip of hand-gathered tulle, then sewing down an 8″ strip of hand-gathered chiffon. I used poly chiffon so I just burned the edges to prevent fraying because the idea of anything else would’ve made me cry tears.

Once all the tiers were sewn down I put a zip in the back and we were good to go!

Hoopskirt:

I read like ten tutorials on how to make a hoopskirt and sort of cobbled together my own method. I knew I didn’t want the hoops to be attached to another skirt because it was already going to be a lot of fabric so I opted for a hoop + strips of fabric method. I was originally going to make a tutorial on how to do it but honestly it turned out looking not so pretty so I’m pretty sure no one should use this method haha. I basically used this tutorial except I used thick twill tape instead of fabric and had no way of stabilizing each inserted hoop where it was supposed to go so the hoops kept sliding around and not staying put. You can kind of see what I’m talking about here and here.

I used about 10 yards of plastic tubing from Home Depot (the kind that was 5/8″ outer circumference and 1/4″ opening). So yeah, the intersections of where the hoop meets the fabric/twill tape need to either be drilled down in place or staple-gunned or something. The tubing itself was great though. It was strong enough to hold its shape as a hoop but super lightweight. Since I didn’t want to spend $5 per tube attacher-thingy, I just cut up two 2″ strips of plastic boning, inserted it into one end of the tube, attached the other end of the hoop, and then taped it closed. It worked surprisingly well! Boyfriend hardcore doubted me. To be fair, it looks quite janky but again, I don’t recommend following this tutorial unless like me, you were three days from needing this dress to be poufy and had no other options.

Kaylee shindig dress

So anyway, WAHHH it’s done!! I can’t wait to wear this while I watch Shindig. I’m not remotely joking.

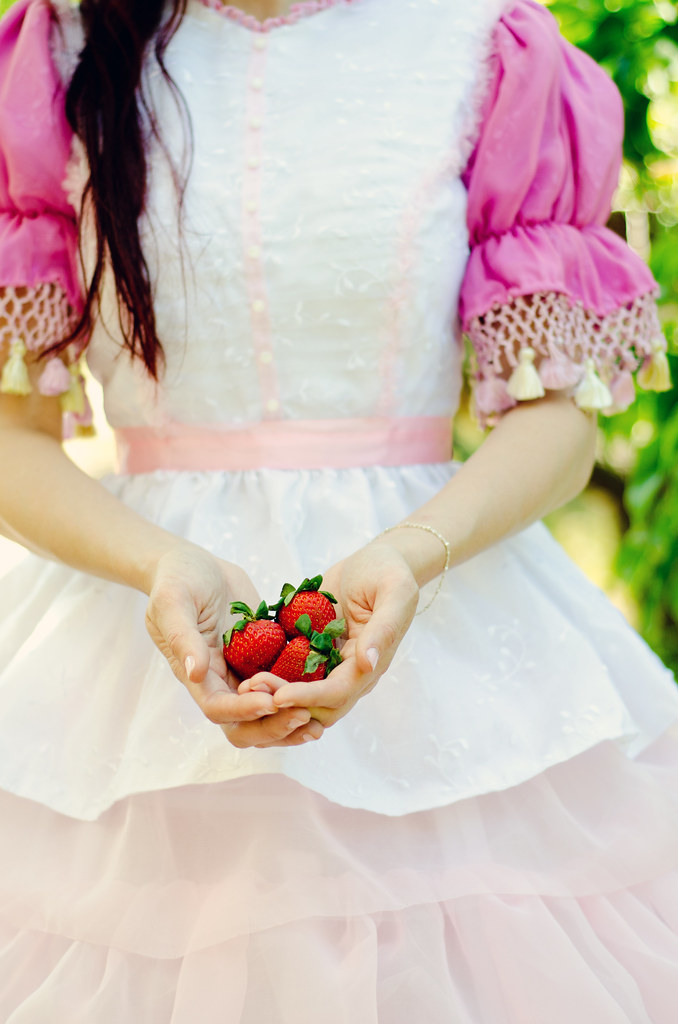
Sidenote: It just occurred to me that the hands-outstretched-with-fruit is highly reminiscent of the covers of a certain sparkly-undead-teenage-abusive-relationship story that will remain unnamed and now I can’t unsee it. GAH. I just needed to incorporate strawberries somehow and a banquet hall buffet table seemed unreasonable. How will we know unless we question it!

Katniss revisited

Katniss reaping dress

Katniss reaping dress

Katniss reaping dress

Katniss reaping dressdress: self-made, pattern here // boots: Clarks

One WIP down! Three to go.

You guys, you have no idea how amazing it feels to finally have fixed this effing hem. You can see my original post with construction details here. (Basically just a modified Darling Ranges bodice with a self-drafted quarter circle-ish skirt. Is that even a thing?) It’s kind of hard to believe that was two whole years ago and this poor dress has been sitting abandoned in the closet ever since. All because of the stupid hem being completely off. By like 4″ on one side. If you go to the original post you can see what I’m talking about in the first photo. But I’ll get back to that tomorrow.

I wanted to style it Katniss-y for photos but I love when costumes are really secret costumes and I can still wear them in public without looking silly. I’m totally going to be wearing this with my Swedish Hasbeens and an over-sized cream cardigan. Or just on its own with some cute sandals.